

How To Install A Nest Camera Outside
Install Nest Cam Outdoor
Brand sure y'all've prepare up your Nest Cam Outdoor with the Nest app earlier you mount it. This commodity picks upward where that one left off.
Scout a video overview
Here'due south a video you lot can watch that will walk you through the steps to install your Nest Cam Outdoor. Read below for boosted information or if you lot need aid with any of the steps.
How to set up and install Nest Cam Outdoor
i. Get started
|  |
ii. Tools you'll need
| Many of the items you'll demand are To install the wall plate and cable If yous'll be using the wall anchors, |  |
three. Options for plugging in your camera
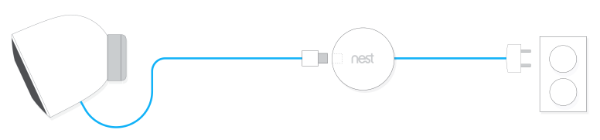
Nest Cam Outdoor's total power cable length is 25 ft (7.5m). You lot'll need to plug information technology into an outlet and so it can stream video 24/7 and send alerts. You accept 2 options:
Utilise an outdoor outlet
The easiest option is to plug it into an outdoor outlet. Y'all might want to install a lockable "while in employ" cover over the outlet to preclude your camera from being unplugged.
Use an adapter
If yous don't have an outdoor outlet, yous tin utilise a light socket adapter, which converts a porch or landscaping light into a ability outlet.
4. Mount your camera
Now that you've prepared your supplies, and decided where you want to put your photographic camera, it'southward time to mountain it.
Larn nigh your photographic camera'due south mounting magnet
| Nest Cam Outdoor'southward versatile mounting The back of Nest Cam Outdoor attaches |  |
Then yous can twist and turn the camera on the mounting magnet to become the view you desire. We designed it with a broad range of motion.
If you end up installing your camera upside downwardly, such every bit nether an eave, you can rotate your photographic camera on the mounting magnet then that it's right side up. Or if the photographic camera needs to stay upside down, for case if you're running the cable to an outlet above the camera, you lot can exit your camera every bit it is and flip the video right side up with the Nest app.
You accept two options for installing your Nest Cam Outdoor. Both are detailed in the sections below.
Choice one: Install the wall plate and mount your camera on brick, wood, or other non-metal surface
If you don't accept a metal surface that the mounting magnet can adhere to, you can install the photographic camera'southward metal wall plate. And so, y'all can stick your Nest Cam and its mounting magnet to the plate and rotate your camera to go the image you want.
|

| 2. Plug in the power cable and adapter | Brand certain there's enough length from the outlet to the |

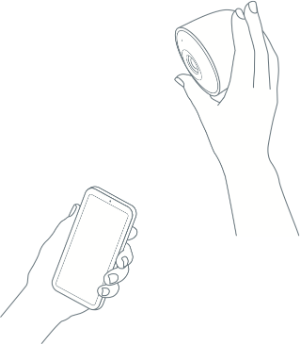
| three. Check Wi-Fi coverage with your camera | Concord your camera upward where you desire to install it, and view If the camera can't connect to Wi-Fi, or if the video stream Troubleshooting when your camera is offline> If you lot need to install your photographic camera beyond the range of your |
| 4. Install the wall plate | One time you've made certain your camera tin can stream video from Remove the protective sticker and backing foam from the We recommend you first drill airplane pilot holes with a 3/32" bit, If the wall is made of a material like brick or stone, you |

| five. Attach photographic camera to wall plate | Once the plate is secure, attach the mounting magnet to Now y'all can remove the sticker from your Nest Cam'southward You tin check your photographic camera'south video stream in the Nest app |

| 6. Secure the cable | Adjacent, you'll demand to secure the power adapter and cablevision. Don't skip this step, which makes information technology harder for your camera to exist accidentally dislodged or tampered with. |
Pick two: Adhere your camera to a metallic surface using the magnet
You can securely adhere your camera to a metal surface fabricated of steel or iron. Keep in listen, the mounting magnet won't stick to other metals similar aluminum or copper.
|
| ii. Plug in the power cable and adapter | Make certain there'southward enough length from the outlet to the |
| iii. Adhere photographic camera | Adhere the mounting magnet to the back of the camera, Since the magnetic ability of different metal surfaces can If yous try to attach your camera to a curved surface, similar a |
| 4. Check Wi-Fi coverage with your camera | If the photographic camera can't connect to Wi-Fi, or if the video stream Troubleshooting when your camera is offline> If you demand to install your camera across the range of your If you haven't done and so notwithstanding, remove the sticker from your |
| 5. Secure the cable | In one case you've made sure your camera tin stream video from its location, you'll need to secure the ability adapter and cable. Don't skip this step, and so that it makes it harder to accidentally dislodge or exist tampered with. |
v. Secure the ability adapter and cable
Whichever way yous mounted your camera, you'll need to adhere your power adapter and cable to a wall or other surface to proceed it secure. This also gives everything a tidy look.
| 1. Install the commencement cable clip | Install the first clip within six inches (15cm) of your camera. Hither's how to install each clip:
Note: If you're tightening the screw with a drill, exist careful |

| 2. Install the power adapter | Nosotros recommend installing the adapter at least 18 inches Place the adapter plate with the flat side facing the wall. Then snap the adapter on. |

| 3. Install the residue of the cablevision clips | Install the second cablevision prune close to where the USB band Install the tertiary clip close to the outlet and then that the cable Install as many of the other clips equally yous demand to road the |
| iv. Tidy up the extra cablevision (optional) | If you end up with extra cable length, hither are some tips to
|
You can pigment the power cord and the cablevision clips to match your habitation so they blend in and are harder to spot. If you added a junction box, y'all can paint it likewise. Don't paint the power adapter or the photographic camera itself.
6. End up
Remove the sticker on the lens if you haven't already. Wipe off any dust or dirt with a soft lint-complimentary cloth
You can paint the cable and the clips to match your home.Do not pigment the camera, this can affect performance and void your warranty.
7. Start using your camera
Was this helpful?
How can nosotros improve it?

Source: https://support.google.com/googlenest/answer/9228553?hl=en
Posted by: lawlercalim1996.blogspot.com
0 Response to "How To Install A Nest Camera Outside"
Post a Comment